I’d like to receive mails at my TLD, which is a premium feature for basically all mail providers I’ve seen. Having access to a (virtual) private server opens up the option to run a private mail server though. This seems like a daunting task because of the many moving parts and security concerns. Luckily there are (external) NixOS modules for that - providing an abstraction layer on top of many packages and their configurations with sensible defaults:
The latter being part of a commercial offering is a plus, but it seems to be quite integrated with their other services, which I don’t need. So SNM it will be. Furthermore I’d like to publish my done TODO items to this blog you’re reading. Some stuff takes quite some time and help of many sources (partially other blogs) to figure out and it doesn’t really hurt to document and share that. So I’ll hack together a configuration, deploy it via NixOps to a local VM, test it, and deploy to my VPS.
Server configuration
base
I like to break the config down into topics and for that to work we’ll need some abstraction for at least the domain, but also the ACME (Let’s Encrypt) stage (depending on connectivity and rate limits):
{ config, lib, ... }:
with lib; {
  options.server = {
    domain = mkOption {
      type = types.str;
    };
    acme = mkOption {
      type = types.enum [ "off" "staging" "production" ];
    };
  };
  config = {
    networking.hostName = config.server.domain;
    security.acme.production = (config.server.acme == "production");
  };
}
These options correspond to the deployment arguments set by NixOps and are relayed by the file pulling the config together:
{ domain, acme }:
{
  network.description = "server";
  server =
  { config, pkgs, ... }:
  {
    imports = [
      ../config/server.nix
      ../config/server-web.nix
      ../config/server-mail.nix
      ../config/monitoring.nix
      ../config/housekeeping.nix
      ../config/security.nix
    ];
    boot.kernelPackages = pkgs.linuxPackages_latest;
    system.stateVersion = "18.09";
    server = { inherit domain acme; };
  };
}
mail server
The configuration for just SNM is pretty simple (their defaults need some substitutions primarily):
{ config, pkgs, ... }:
with config.server; {
  imports = [
    ./server.nix
    ((builtins.fetchGit {
      url = "https://gitlab.com/simple-nixos-mailserver/nixos-mailserver";
      rev = "1c1e301c115f1288d182a47a4e8077e9c25e81d6";
    }) + "/default.nix")
  ];
  mailserver = {
    enable = true;
    fqdn = "mail.${domain}";
    domains = [ domain ];
    loginAccounts = with import ../private.nix; (mailAccounts domain);
    certificateScheme = if (acme != "off") then 3 else 2;
    enableImap = true;
    enablePop3 = true;
    enableImapSsl = true;
    enablePop3Ssl = true;
    enableManageSieve = true;
    virusScanning = false;
    policydSPFExtraConfig = ''
      skip_addresses = 127.0.0.0/8,::1,192.168.0.0/16
    '';
  };
}
This should be pretty self-explanatory; we simply put our domain where it belongs, set the certificateScheme according to the stage and open up some IPs for testing purposes. For the login accounts I’m using a function that takes the domain, basically like this:
mailAccounts = domain: {
  "mail@${domain}" = {
    hashedPassword = accounts.user.passwordSha512;
    catchAll = [
      domain
    ];
  };
};
web server
This blog is written as an org-mode TODO list and exported via ox-hugo to Hugo compatible markdown. nginx seems to be the go to server for static sites, so I use that to host it and renew certificates automatically:
{ config, pkgs, ... }:
let
  blog = import /home/jonas/blog/default.nix;
  tls = (config.server.acme != "off");
in {
  services.nginx.enable = true;
  services.nginx.virtualHosts."${config.server.domain}" = {
    locations."/".root = "${blog}/var/www";
    enableACME = tls;
    forceSSL = tls;
  };
  networking.firewall.allowedTCPPorts = [ 80 443 ];
}
The blog is deployed from my local copy because it would be a bit too cumbersome to commit every change to gitlab, change the revision and hash of the derivation src, deploy to the virtual machine, notice something wrong and repeat all of that.
security
The first thing in terms of server security is probably to disable password and root logins via SSH. NixOps handles the login via certificates, but logs in as root, which is probably not that big a deal if the login can’t be brute forced. Another option to make it a bit harder for attackers / keep the logs short is to use a custom SSH port, because port scans take time which could be better spent attacking other servers. Sadly NixOps doesn’t really want that (see issue), but that would only be security by obscurity anyway …
As it stands dovecot and postfix are exposed to the public and allow password login and therefore brute force attacks. I don’t have alerting in place yet and wouldn’t want to deal with that sort of attack anyway, when there are automatic defenses. The first that came to mind is fail2ban, but the setup seems a bit complicated. Searching the NixOS options I’ve also come across sshguard, which is dead easy to configure: just give it some systemd service names and that’s that:
services.sshguard = rec {
  enable = (builtins.length services) > 0;
  services = with lib; with config.services; []
    ++ (optional openssh.enable "sshd")
    ++ (optional dovecot2.enable "dovecot2")
    ++ (optional postfix.enable "postfix")
  ;
};
Automatic updates are a nice NixOS feature, but currently unavailable for NixOps machines due to missing configuration.nix. So I’ll have to re-deploy from time to time to get security patches ..
The only other measure I can think of is to hide software versions where possible, so attackers don’t know which vulnerabilities they can aim for. But that’s already the default for services.nginx.serverTokens and I wasn’t able to find similar knobs for dovecot and postfix, so no need to change anything.
monitoring
The big issue with having your own server is its maintenance. And for that you have to know what was and is going on on the system. Some metrics about resource usage and blog visits would also be interesting.
journald already takes care of basic logging. nginx can be made to log requests to it:
services.nginx.appendHttpConfig = ''
  log_format json_combined escape=json '{ "timestamp": "$time_iso8601", '
    '"remote_addr": "$remote_addr", '
    '"remote_user": "$remote_user", '
    '"request_url": "$request_uri", '
    '"req_status": "$status", '
    '"response_size_B": "$bytes_sent", '
    '"req_protocol": "$server_protocol",'
    '"req_method": "$request_method",'
    '"req_srvname": "$server_name",'
    '"req_time": "$request_time",'
    '"connection-id": "$request_id",'
    '"ssl_prot_version": "$ssl_protocol",'
    '"ssl_cipher": "$ssl_cipher",'
    '"ssl_conn_reused": "$ssl_session_reused",'
    '"ssl_session_id": "$ssl_session_id",'
    '"http_referrer": "$http_referer", '
    '"http_user_agent": "$http_user_agent", '
    '"http_x_referer": "$http_x_referer" }';
  access_log syslog:server=unix:/dev/log,nohostname json_combined;
'';
This custom JSON format is a bit verbose, but will come in handy if I decide to change something here - the parsing will be the same. As for metrics collectd has plenty of plugins for just about everything, so I’ll go with that:
services.collectd = {
  enable = true;
  extraConfig = ''
    LoadPlugin "cpu"
    <Plugin "cpu">
      ValuesPercentage true
    </Plugin>

    LoadPlugin "memory"
    LoadPlugin "swap"
    LoadPlugin "interface"
    LoadPlugin "df"

    LoadPlugin "rrdtool"
    <Plugin "rrdtool">
      DataDir "/var/lib/collectd/rrd"
      CacheTimeout 10
    </Plugin>

    LoadPlugin "network"
    <Plugin "network">
      Server "127.0.0.1" "${logstashCollectdPort}"
    </Plugin>
  '';
};
Most of this should be self-explanatory. I use rrdtool as a backup here, as it does its own housekeeping by keeping older metrics around, but with reduced accuracy. The network plugin is the primary output and pushes metrics to the monitoring solution. journald doesn’t do that by itself, so journalbeat is needed:
services.journalbeat = {
  enable = true;
  extraConfig = ''
    output.logstash:
      enabled: true
      hosts: ["127.0.0.1:${logstashBeatsPort}"]
  '';
};
Some might have seen where this is going ..
A monitoring solution had to be picked, but there are honestly too many of these and too few comparisons, so I just went with the seemingly most popular: ELK.
The setup via NixOS modules is pretty simple, though you have to pick the specific oss packages if you don’t want to set the allowUnfree flag:
services.logstash = {
  enable = true;
  package = pkgs.logstash6-oss;
  inputConfig = ''
    beats {
      port => ${logstashBeatsPort}
    }
    udp {
      port => ${logstashCollectdPort}
      buffer_size => 1452   # 1452 is the default buffer size for collectd
      codec => collectd { }
      type => collectd
    }
  '';
  filterConfig = ''
    json {
      source => "MESSAGE"
      target => "HTTP"
      skip_on_invalid_json => true
    }
  '';
  outputConfig = with config.services.elasticsearch; ''
    elasticsearch {
      hosts => ["${listenAddress}:${toString port}"]
    }
  '';
};
Logstash serves as the input service of the stack and is set up with a single pipeline in this case. I would rather use two seperate pipelines for journald and collectd (or perhaps another one for nginx), but the NixOS module doesn’t expose that option. It isn’t really an issue anyway, as there’s only a single output and the filter that turns the nginx access log into seperate fields is allowed to fail. What remains of ELK is Elasticsearch (the database) and Kibana (the output):
services.elasticsearch = {
enable = true;
package = pkgs.elasticsearch-oss;
};
services.kibana = {
enable = true;
package = pkgs.kibana-oss;
elasticsearch.url = with config.services.elasticsearch; "http://${listenAddress}:${toString port}";
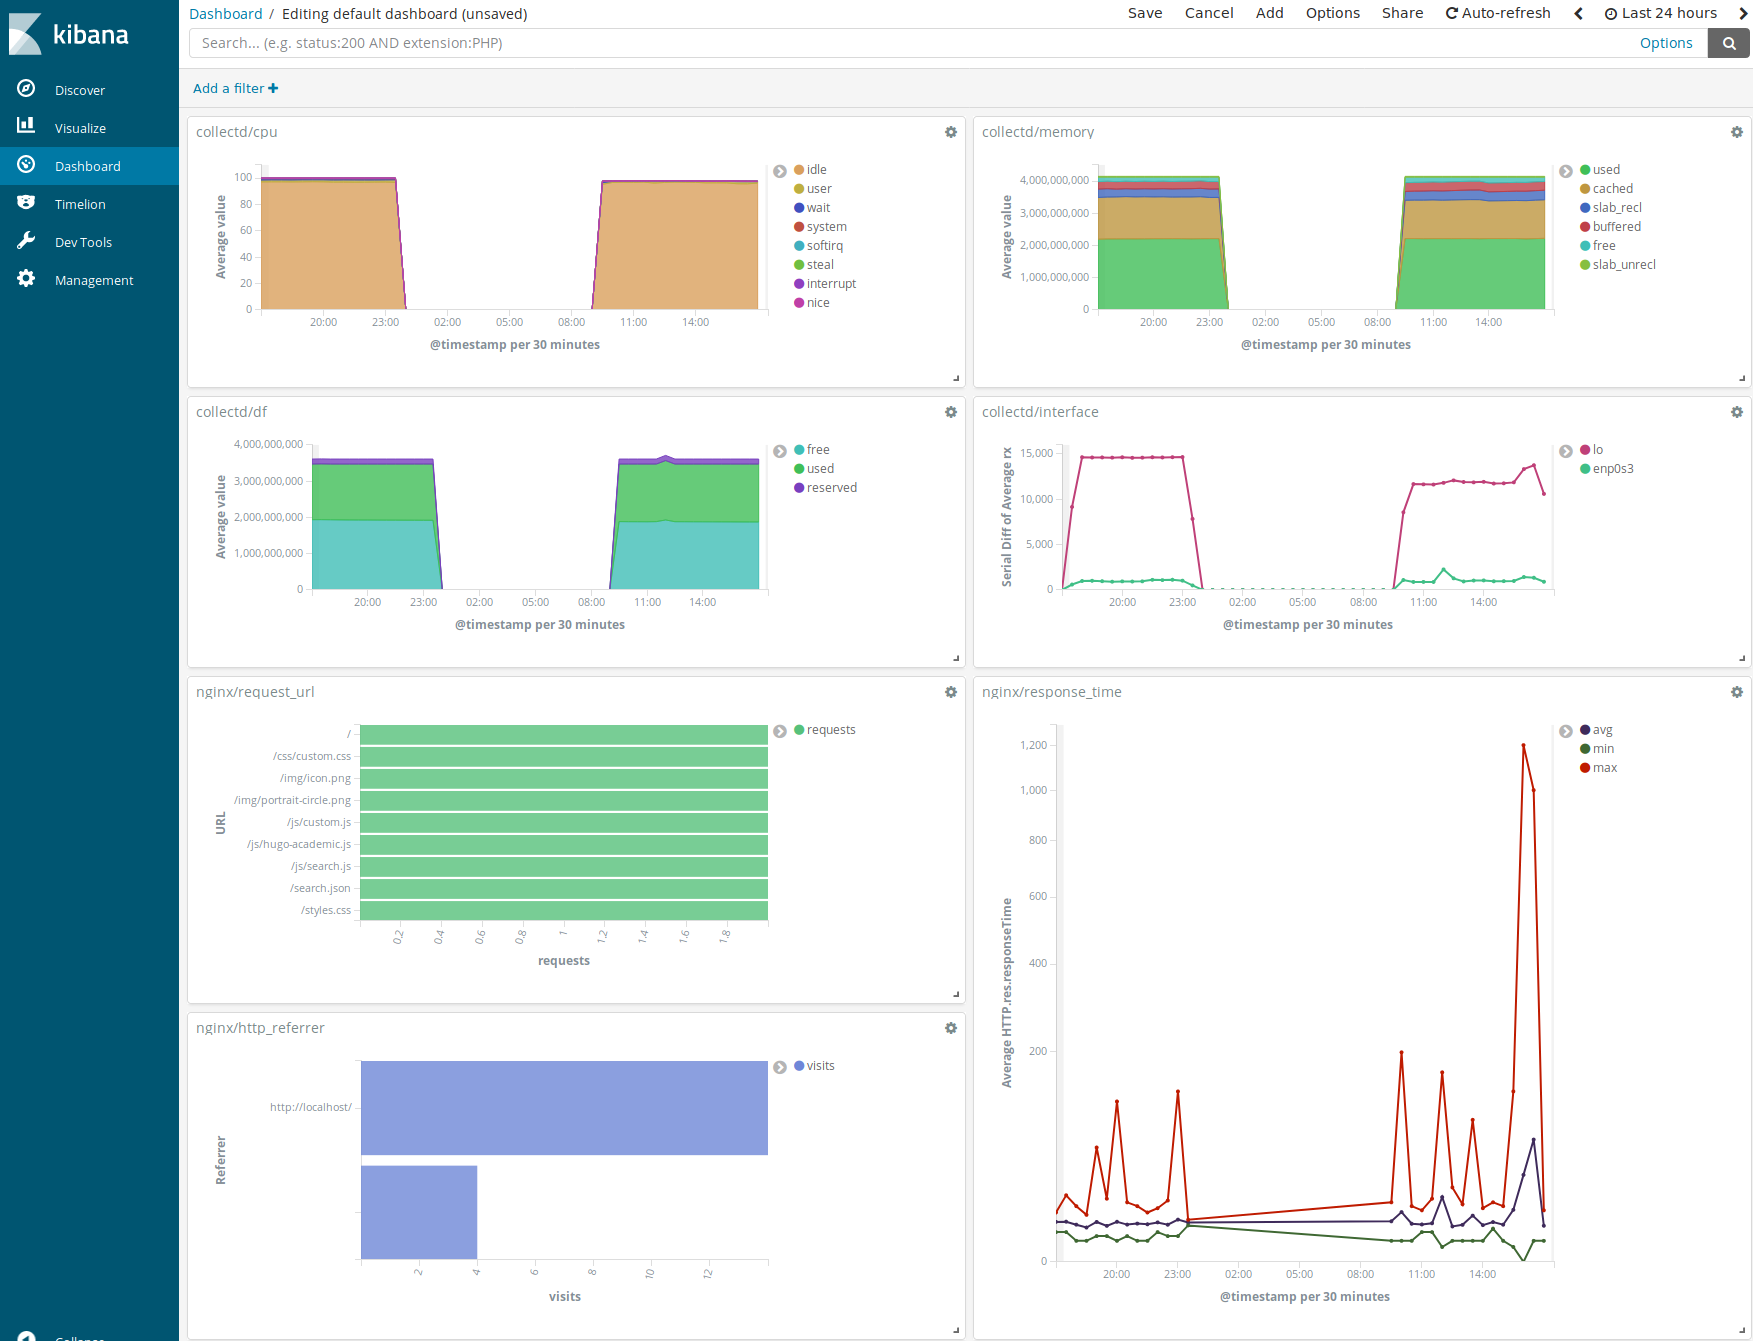
};I’m sure there’s a lot more you could do to optimize a database, but the defaults work just fine.
I’ve played around a lot with Kibana, but going in-debt is a bit out of scope here .. I’ll just leave a screenshot of my dashboard here (in need of improvement):
housekeeping
Logs just keep getting longer, elasticsearch is fed data all the time and disk space is finite. Therefore some limits are needed because I don’t want to do this manually every so often. I’ll opt for time based instead of storage based limits though - there’s simply no need to analyze data from 3 months ago, which is where I’ll draw the line, while with size based limits I risk losing recent data to some sort of spam / bug.
For journald that’s done with the settings MaxFileSec and MaxRetentionSec:
services.journald.extraConfig = ''
  MaxFileSec=1day
  MaxRetentionSec=3month
'';
And elasticsearch can be cleaned by the newly packaged elasticsearch-curator service:
services.elasticsearch-curator = {
  enable = config.services.elasticsearch.enable;
  actionYAML = ''
    actions:
      1:
        action: delete_indices
        description: >-
          Delete indices older than 3 months (based on index name), for logstash-
          prefixed indices. Ignore the error if the filter does not result in an
          actionable list of indices (ignore_empty_list) and exit cleanly.
        options:
          ignore_empty_list: True
          disable_action: False
        filters:
        - filtertype: pattern
          kind: prefix
          value: logstash-
        - filtertype: age
          source: name
          direction: older
          timestring: '%Y.%m.%d'
          unit: months
          unit_count: 3
  '';
};
backups
I’d guess the most popular backup strategy is using rsync to copy what you want, stop all services that could write to that, copy everything written between the first sync and the services stop and start the services again, thus keeping the downtime short … or something along these lines. That’s a bit complicated and causes downtime when there’s another contender: atomic filesystem snapshots!
I haven’t had issues with btrfs and so will use it for this purpose (though ZFS is another option). The upside of this approach is that the snapshot is an atomic operation, so services don’t really need to be stopped. The downside is that restoring such a snapshot is the same as starting the services after a power outage. I’d like to expect that this isn’t an issue, perhaps some data lost, but that would’ve been the case for a snapshot a few minutes earlier, too. Any service not able not cope with writing consistent data I’d rather not use to be honest.
So how do we go about this? First create snapshots in a set interval (and clean old ones) and then back them up.
For periodical btrfs snapshots snapper seems to be the right tool, but as it turns out these snapshots aren’t as portable as I’d like them to be. My plan is to keep most snapshots on the server and only pull daily ones to my workstation while the retention policies also differ. snapper didn’t detect pulled snapshots and couldn’t clean up old ones, which led me to an apparently simpler alternative: btrbk
{ config, pkgs, ... }:
let
  btrfsVolume = "/mnt/btr_pool";
in {
  fileSystems.${btrfsVolume} = {
    device = "/dev/vg/root";
    fsType = "btrfs";
  };
  environment.etc."btrbk.conf".text = ''
    timestamp_format        long
    snapshot_preserve_min   72h
    snapshot_preserve       72h 30d 6m

    volume ${btrfsVolume}
      snapshot_dir snapshots/var
      subvolume var
  '';
  systemd.services.btrbk = {
    serviceConfig.ExecStart = "${pkgs.btrbk}/bin/btrbk run";
  };
  systemd.timers.btrbk = {
    wantedBy = [ "basic.target" ];
    timerConfig.OnCalendar = "00/3:00";
  };
  system.activationScripts.btrbk = {
    deps = [];
    text = "${pkgs.btrbk}/bin/btrbk --override group=profile-activation run";
  };
  environment.systemPackages = [ pkgs.btrbk ];
}
For some reason the btrfs file system has to be mounted (I usually only mount its subvolumes). The btrbk configuration is pretty straight-forward: snapshot /mnt/btr_pool/var into /mnt/btr_pool/snapshots/var and keep hourly snapshots around for 72h, daily ones for 30d and monthly ones for 6m. The systemd configuration isn’t much different from a simple cron job running in an 3h interval and because a lot can happen in 3h, a destructive deployment for example, I also use a profile activation script to make a snapshot right before changes go live.
This isn’t much of a backup yet, because a disk failure would be pretty bad with snapshots on the same disk. I’d imagine the best solution to this to be pushing snapshots to some sort of always online append-only storage or a cloud provider after encryption. But I don’t want to be too crazy about this (and look at the backup sizes first) and just pull the snapshots to my workstation:
{ config, pkgs, ... }:
let
  backupLocation = (import ../private.nix).paths.backup + "/server-var";
in {
  environment.etc."btrbk.conf".text = ''
    target_preserve_min        no
    target_preserve            30d 6m

    volume ssh://oddco.de/mnt/btr_pool
      subvolume var
        snapshot_dir           snapshots/var
        snapshot_preserve_min  all
        snapshot_create        no
        target send-receive    ${backupLocation}
  '';
  environment.systemPackages = [ pkgs.btrbk ];
}
With this only 30 daily and 6 monthly snapshots are pulled and kept via sudo btrbk run.
Deploying to a local virtual machine
The NixOps manual starts with a VirtualBox example. Actually trying it out results in a NixOS 16.09 image (more than 2 years old) and a VERR_INTERNAL_ERROR, which might be the result of a version mismatch with the running NixOS host …
Let’s go with libvirtd then. First we need to set some options on the host:
virtualisation.libvirtd.enable = true;
users.users.myuser.extraGroups = [ "libvirtd" ];
networking.firewall.checkReversePath = false;
Then a directory for the images needs to be created with appropiate ownership:
sudo mkdir /var/lib/libvirt/images
sudo chgrp libvirtd /var/lib/libvirt/images
sudo chmod g+w /var/lib/libvirt/images
A NixOps deployment usually consists of 2 files: the basic configuration and one dependent on the used backend. The first one we’ve seen already. As for the libvirtd dependent configuration (let’s name it server.test.nix), it couldn’t be much simpler:
{
  server = {
    deployment.targetEnv = "libvirtd";
    deployment.libvirtd.memorySize = 4096;
  };
}
All that’s left is creating the deployment, settings its arguments and … deploying it:
nixops create /etc/nixos/nixops/server.nix /etc/nixos/nixops/server.test.nix -d server.test
nixops set-args -d server.test --argstr domain "oddco.de.local" --argstr acme "off"
nixops deploy -d server.test
I haven’t found an easy way to assign an IP to the machine, but it doesn’t change, so I just gave it a hostname for easier access:
networking.extraHosts = "192.168.122.192 oddco.de.local";The issue with this deployment is that it isn’t publicly available and the certificate renewal service will fail. For that to work I would need to set a DNS entry for something like dev.oddco.de to my daily changing, local IP. There are DynDNS-like solutions for that, but this is honestly too much of a hassle. If it doesn’t work, the rollback is just one command away anyway.
Testing
There are basically 4 services to test:
- sshd
- nginx
- SNM
- Kibana (everything else should be visible there)
For this I wrote a simple expect / tcl script that tries to get each service to write something into the server log and therefor Elasticsearch:
#!/usr/bin/env expect
set deployment [lindex $argv 0]
set domain [exec nixops info -d $deployment | grep -oP {domain = "\K[^"]+}]

set now [clock milliseconds]
proc id { service } {
  global now
  return "nixops-test-$service-$now"
}
proc http_request { protocol domain } {
  set ua [id $protocol]
  return "GET / HTTP/1.1\nHost: $domain\nUser-Agent: $ua\nConnection: close\n\n"
}

set ssh "NOK"
catch {
  spawn sshpass -p "dummy" ssh -v -o NumberOfPasswordPrompts=1 [id "ssh"]@$domain
  expect "Connection established" {
    set ssh "OK"
  }
  close
}

set http "NOK"
spawn telnet $domain 80
expect "Connected" {
  send [http_request "http" $domain]
  expect "nginx" { set http "OK" }
  close
}

set https "NOK"
spawn openssl s_client -connect $domain:443
expect "CONNECTED" {
  send [http_request "https" $domain]
  expect "nginx" { set https "OK" }
  close
}

set smtp "NOK"
spawn openssl s_client -connect $domain:25 -starttls smtp
expect "250" {
  send "EHLO $domain\r"
  expect "250"
  send "AUTH LOGIN\r"
  expect "334 VXNlcm5hbWU6"
  set user [exec echo [id "smtp"] | base64]
  send "$user\r"
  expect "failed" { set smtp "OK" }
  close
}

set imap "NOK"
spawn openssl s_client -connect $domain:993
expect "* OK" {
  send "a login \"[id imap]@$domain\" \"dummy\"\r"
  expect "failed" { set imap "OK" }
  close
}

after [expr 62*1000]
proc log_num { id } {
  return [exec curl -s "http://localhost:9200/_count?q=\"$id\"" | grep -oP {"count":\K[^,]}]
}
proc log_format { num } {
  if [expr $num > 0] {
    return "LOG:$num"
  } else {
    return "NOLOG"
  }
}
#spawn nixops ssh -d $deployment server -fnNT -L 9200:localhost:9200 &
set ssh_log [log_format [log_num [id "ssh"]]]
set http_log [log_format [log_num [id "http"]]]
set https_log [log_format [log_num [id "https"]]]
set smtp_log [log_format [log_num [id "smtp"]]]
set imap_log [log_format [log_num [id "imap"]]]

puts "\n\n\n"
puts "SSH:   $ssh  $ssh_log"
puts "HTTP:  $http  $http_log"
puts "HTTPS: $https  $https_log"
puts "SMTP:  $smtp  $smtp_log"
puts "IMAP:  $imap  $imap_log"
The sshpass part seems a bit flaky and may exit before even leaving a log entry, and spawning an SSH tunnel didn’t work for some reason (possibly due to my SSH agent), which you would need to do by hand, but the rest seems to work fine. Luckily I took the time to also test the monitoring … dovecot login attempts don’t make it into the log by default, which means that sshguard can’t see and block them either. To fix this add auth_debug=yes to services.dovecot2.extraConfig.
Installing NixOS on a remote server
Installing an operating system on a remote machine can be tricky if it’s not supported by the server provider; and with NixOS being rather exotic that’s usually the case, as with my provider Contabo. But they offer me a rescue shell, so the procedure doesn’t differ that much from the usual. Instead of booting from a CD we just have to chroot into one (as described in the wiki). First the disk has to be partitioned and formatted though. Here we can simply follow the NixOS manual.
I tried the UEFI (GPT) way first, but it doesn’t seem supported on my VPS, so MBR it is. Apart from that the formatting is actually similar to my desktop setup (just with fdisk).
This includes full disk encryption, which isn’t really due to distrusting the hoster (bare metal access beats everything anyway), but rather to not having raw sensitive data exposed in case of a breach or similar scenarios. The setup is easy and it only requires an additional input for a rare restart of the server, so I’ll just go ahead with it is what I’m thinking:
fdisk /dev/sda
mkfs.ext4 /dev/sda1
cryptsetup luksFormat /dev/sda2
cryptsetup luksOpen /dev/sda2 enc-pv
pvcreate /dev/mapper/enc-pv
vgcreate vg /dev/mapper/enc-pv
lvcreate -L 180G -n root vg
lvcreate -l '100%FREE' -n swap vg
mkfs.btrfs -L root /dev/vg/root
mkswap -L swap /dev/vg/swap
mount -t btrfs /dev/vg/root /mnt
btrfs subvol create /mnt/nixos
umount /mnt
/dev/sda1 has a size of 1G and will be the boot partition, which isn’t exactly necessary when embedding GRUB. But it’s a good place to put the initial RAM disk compared to the encrypted partition that would have to be decrypted by GRUB requiring the pass phrase an additional time via VNC for example.
200GiB of disk space are available to me which results in around 20GiB of swap space. This may seem a bit much, but it’s not like I need a lot of disk space for anything else and this gives me more time to react to memory leaks or similar issues. Now onto the installation in a chroot, which is explained in the wiki:
mkdir -p inst host/nix
wget https://d3g5gsiof5omrk.cloudfront.net/nixos/17.03/nixos-17.03.1449.2e983f14f6/nixos-minimal-17.03.1449.2e983f14f6-x86_64-linux.iso
modprobe loop
mount -o loop nixos-minimal-17.03.1449.2e983f14f6-x86_64-linux.iso inst
unsquashfs -d host/nix/store inst/nix-store.squashfs '*'
cd host
mkdir -p etc dev proc sys
cp /etc/resolv.conf etc/resolv.conf.bk
for fn in dev proc sys; do mount --bind /$fn $fn; done
INIT=$(find . -type f -path '*nixos*/init')
BASH=$(find . -type f -path '*/bin/bash' | tail -n 1)
sed -i "s,exec systemd,exec /$BASH," $INIT
chroot . /$INIT
This didn’t seem to work with current ISOs (18.09), but upgrading later isn’t a problem. Now we just have to mount the root file system and let nixos-generate-config do its thing:
mount -t btrfs -o defaults,ssd,noatime,subvol=nixos /dev/vg/root /mnt
nixos-generate-config --root /mnt
With this the hardware-configuration.nix should look fine in terms of kernel modules, but the fileSystems and related options need a rework:
fileSystems."/boot" = {
  device = "/dev/sda1";
  fsType = "ext4";
};
boot.initrd.luks.devices.luksroot = {
  device = "/dev/sda2";
  preLVM = true;
  allowDiscards = true;
};
fileSystems."/" = {
  device = "/dev/vg/root";
  fsType = "btrfs";
  options = [ "defaults" "ssd" "discard" "noatime" "subvol=nixos" ];
};
swapDevices = [{
  device = "/dev/vg/swap";
}];
Add the following lines to the configuration.nix to install GRUB correctly, start an SSH server on boot to enter the LUKS pass phrase and another SSH server afterwards to deploy the server. If dropbear (the initrd SSH server) gives you trouble, you can just remove these lines and use VNC instead if possible:
boot.loader.grub.device = "/dev/sda";
boot.loader.grub.copyKernels = true;
boot.initrd.network.enable = true;
boot.initrd.network.ssh.enable = true;
boot.initrd.network.ssh.authorizedKeys = [ "ssh-rsa ..." ];
boot.kernelPackages = pkgs.linuxPackages_latest;
services.openssh.enable = true;
services.openssh.permitRootLogin = "yes";
users.extraUsers.root.initialPassword = "rootInitialPassword";
Now everything should be ready to actually start the installation. You may need to restore connectivity by restoring resolv.conf.
mv /etc/resolv.conf.bk /etc/resolv.conf -f
env NIXOS_INSTALL_REEXEC=1 nixos-install
NIXOS_INSTALL_REEXEC=1 is necessary if you get unshare: cannot change root filesystem propagation: Invalid argument without it, but results in Nix not cleaning up after itself if something goes wrong. The easiest way to clean up yourself is of course to restart and start over …
If everything went well, you can now reboot the machine and upgrade to a more recent channel. Do note that if you too encrypt your root partition and set up dropbear in your initrd, you’ll have to log in with the configured SSH identity and run cryptsetup-askpass to enter the LUKS pass phrase and continue booting.
Deploying to the server
The basic configuration of the production server is the same, but we’ll have to do some adjustments according to the different backend. While the libvirtd backend took care of everything by itself, we now have to deal with the file system, boot loader and ssh server. I’ve ended up with the following server.prod.nix:
{
  server = {
    deployment.targetHost = "oddco.de";
    fileSystems."/boot" = {
      device = "/dev/sda1";
      fsType = "ext4";
    };
    boot.initrd.luks.devices.luksroot = {
      device = "/dev/sda2";
      preLVM = true;
      allowDiscards = true;
    };
    fileSystems."/" = {
      device = "/dev/vg/root";
      fsType = "btrfs";
      options = [ "defaults" "ssd" "discard" "noatime" "subvol=nixos" ];
    };
    fileSystems."/var" = {
      device = "/dev/vg/root";
      fsType = "btrfs";
      options = [ "defaults" "ssd" "discard" "noatime" "subvol=var" ];
    };
    # see https://github.com/elastic/elasticsearch/issues/23710
    fileSystems."/var/lib/elasticsearch" = {
      device = "/dev/vg/root";
      fsType = "btrfs";
      options = [ "defaults" "ssd" "discard" "noatime" "subvol=var-lib-elasticsearch" ];
    };
    swapDevices = [{
      device = "/dev/vg/swap";
    }];
    boot.loader.grub.enable = true;
    boot.loader.grub.version = 2;
    boot.loader.grub.device = "/dev/sda";
    boot.loader.grub.copyKernels = true;
    boot.initrd.availableKernelModules = [ "ata_piix" "uhci_hcd" "virtio_pci" "virtio_blk" ];
    boot.initrd.supportedFilesystems = [ "btrfs" ];
    boot.initrd.network.enable = true;
    boot.initrd.network.ssh.enable = true;
    boot.initrd.network.ssh.authorizedKeys = with import ../private.nix; [ ssh."root@boot.oddco.de".pub ];
    services.openssh.enable = true;
    services.openssh.permitRootLogin = "yes";
    services.openssh.passwordAuthentication = false;
    users.extraUsers.root.openssh.authorizedKeys.keys = with import ../private.nix; [ ssh."root@oddco.de".pub ];
    imports = [
      <nixpkgs/nixos/modules/profiles/qemu-guest.nix>
      ../config/server/backup.nix
    ];
  };
}
For kernel modules consult your generated hardware-configuration.nix. As mentioned previously NixOps logs in as root, so we have to manually permit this as it’s usually not a good idea. I’ve also set up my own ssh key, which shouldn’t be necessary because NixOps generates one either way.
How to deploy this should be obvious by now:
nixops create /etc/nixos/nixops/server.nix /etc/nixos/nixops/server.prod.nix -d server.prod
nixops set-args -d server.prod --argstr domain "oddco.de" --argstr acme "production"
nixops deploy -d server.prod
You’ll have to log in with the previously set root password and hope this’ll work out. If that’s not the case It’s likely an issue with the file system (are all btrfs subvolumes and other paths actually present?) or ACME (are the DNS settings of your domain correct? If you use SNM, do follow their setup guide).
Conclusion
I can’t claim to have a lot of experience with these matters, but I gained some. It was an interesting ride and I like the result, which will surely be refined a bit in the future. In the process I’ve made some mistakes, which I found and learned from; should you find some not pointed out, please do let me know! But as I’ve let the server run for a few weeks before publishing this write-up, it’s probably not a recipe for disaster … or so I hope ;)